Thursday, May 30, 2019

Artisan Bouquet


I just fell in love with Zoe's card (right) from the Stamping Scene Blog. Such a a cute way to frame the sentiment! Thanks Zoe for your lovely inspiration!

I chose to create a 4.25x5.5 card rather than a square card. I also used different frames and stamps than what Zoe did, but it was similar enough that I wanted to give her the credit! I made the frame from the 'Layered Squares' framelits. The flowers and leaves are from the stamp set 'Beautiful Bouquet' with it's coordinating 'Bouquet Bunch' framelits.

Thanks for taking a closer look!

Supplies Used:
Stamp Sets - Beautiful Bouquet, Artisan Textures
Ink - Powder Pink, Merry Merlot
Paper - Powder Pink, Merry Merlot, Basic Black, Smoky Slate, Whisper White
Accessories - Big Shot, Bouquet Bunch Framelits, Layering Squares Framelits, glue dots, dimensionals, Basic Rhinestones


Tuesday, May 28, 2019

Birthday Roots

The 'Rooted In Nature' stamp set offers much diversity for masculine -- as well as -- feminine cards. The stamp set coordinates with the 'Nature's Root' Framelits for easy die-cut shapes.

I paired this stamp set with the 'Happy Birthday Gorgeous' sentiment stamp.

Thanks for dropping by!

Supplies Used:
Stamp Sets - Rooted in Nature, Happy Birthday Gorgeous
Ink - Early Espresso, Old Olive, Mossy Meadow
Paper - Old Olive, Early Espresso, Crumb Cake, Whisper White
Accessories - Big Shot, Nature's Roots Framelits, Layering Squares Framelits, glue dots, Pinewood Planks DTIEF


Saturday, May 25, 2019

Wooden Vases

I wanted to try my hand at shading with the 'Varied Vases' stamp set. I used Early Espresso to stamp the vase images, then colored them in using the Stampin' Blends markers - Crumb Cake (light and dark) and Color Lifter.

I still think I need to try harder to get it perfect, but I believe this try was pretty close! =)

I stamped from the 'Vibrant Vases' set the tulips in Melon Mambo and Crushed Curry, then colored them in with Pink Pirouette and Daffodil Delight.

Thanks for taking a peek!

Supplies Used:
Stamp Sets - Varied Vases, Vibrant Vases, Happy Birthday Gorgeous
Ink - Early Espresso, Melon Mambo, Crushed Curry, Old Olive, Stampin' Blends (Crumb Cake, Color Lifter, Daffodil Delight, Old Olive, Pink Pirouette)
Paper - Crumb Cake, Early Espresso, Whisper White, Wood Textures DSP
Accessories - scissors, Vases Builder punch, glue dots, Melon Mambo taffeta ribbon, Daffodil Delight organdy ribbon


Tuesday, May 21, 2019

Happy Home

For my best friend, who just moved into a new home! Congratulations!

I utilized my digital software for this card, as they had a cute image of a home with a wonderful saying. I printed it out on Very Vanilla cardstock and finished the card the traditional way.

Thanks for taking a closer look!

Supplies Used:
My Memories Suite digital software
Embellishments - Happy Home Sampler (Valerie)
Paper - Very Vanilla, Soft Suede, Old Olive
Accessories - Old Olive Striped Organdy Ribbon

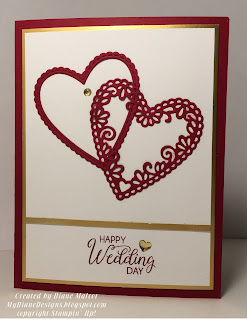
Meant to Be Beautiful

My niece is getting married (the first niece/nephew in the family). Yay! Congratulations to them!  I had the wonderful opportunity to create their wedding invitations, so I was privy to their wedding colors way in advance. Burgundy and White. So, I chose to create their wedding card with those colors.

I used the 'Be Mine' framelits to create the his and her hearts, and used the sentiment from 'Beautiful Bouquet' stamp set.

I finished the piece with gold accents -- gold foil paper and gold enamel shapes. (You may not see, but I did place two gold dots on the "masculine" heart. Kinda like a tux for the man... and the lace heart is like her wedding dress.

Thanks for taking a peek!

Supplies Used:
Stamp Set - Beautiful Bouquet
Ink - Merry Merlot
Paper - Merry Merlot, Whisper White, Gold Foil
Accessories - Big Shot, Die Brush, Precision Plate, Be Mine Framelits, Gold Enamel Shapes


Tori and Aaron Wedding


I was honored to be asked to create the 'Save the Date' and Wedding Invitations for my niece, Tori, and her now husband, Aaron. Her colors were burgundy and white, and she loved the intricate die-cut shape in the 'Detailed Floral' thinlits.

The 'Save the Date' cards were pretty simple to create. Measuring 4.25"x5.5". The wording was designed in my digital software (My Memories Suite) and printed on Whisper White cardstock. I was able to fit 4 on an 8.5"x11" piece of cardstock. I cut the white sections to 4"x5.25". The die-cut shape was made with the Big Shot and adhered to the white cardstock on the bottom.


The wedding invitations measure 5"x7". The actual invitation is a pocket card made from an 8.5"x11" piece of burgundy cardstock. I cut the piece to 8.5"x10". Along the long side I scored at 5". Turning it to the short side, I scored at 7" to the scored line from the previous instructions... then cut the rest on the 7". Turning the piece to the long side again, I cut the 1.5" off the bottom left-hand side. Now, folding on the scored lines... I used glue dots to adhere the "pocket" on the bottom of the right-hand side to the right side of the invite.

The wording for both the invite and the response card was again designed in my digital software and printed on Whisper White cardstock. I was able to fit 2 invites per 8.5"x11 piece. I was able to fit 3 responses to an 8.5"x11 piece (response card measures 3.5"x5").

I used the 'Detailed Floral' thinlit for both the response cards and the invite. As you can see, I had to be creative in making the die-cut shape fit the top of the invite -- as the die-cut shape was too small for the piece. Yes, I die-cut the piece twice to create a mirrored image on top! Clever! I used spray adhesive to adhere the intricate die-cut shape to the invite.

For the front of the invite, I used my software to print their names out and printed them on Whisper White cardstock. I was able to fit 18 on a piece of 8.5"x11" piece of cardstock. I then stamped the 'Special Reason' frame shape (in Merry Merlot ink) around the names and die-cut them out using the 'Stylish Stems' framelits.

Thanks for taking a peek!

Supplies Used:
My Memories Suite digital software
Fonts used - At Last Greeting (Invite), Chancellor (both), Castellar (Save the Date)
Paper - Wine (purchased at Hollo's papercraft), Whisper White
Stamp set - Special Reason
Ink - Merry Merlot
Accessories - Big Shot, Detailed Floral Thinlits, Stylish Stems Framelits, Whisper White Organza Ribbon

Tranquil Sea


I saw Gail's cute card (right) on Pinterest (sorry I don't have your last name Gail... it was only a picture on Pinterest and not a link to your site). Thanks to your inspiration, I was able to create a card similar to hers!

I used the DSP (Designer Series Paper) from 'Wood Textures' , 'Tranquil Textures' and the Gold Foil. I used the Glitter Epoxy Shapes to create the ship hole... and if you can see it... I used them on the octopus' eyes.

Thanks for dropping by!

Supplies Used:
Stamp Set - Sea of Textures
Ink - Tranquil Tide
Paper - Very Vanilla, Tranquil Textures DSP, Wood Textures DSP, Gold Foil, Balmy Blue, Tranquil Tide
Accessories - Big Shot, Precision Plate, Under the Sea Framelits, Circles Collection Framelits, Glitter Epoxy Shapes, dimensionals, glue dots


Tuesday, May 14, 2019

Birthday Dreams


This is a simple yet fantastic masculine birthday card. It utilizes only 2 stamps sets, 'World of Dreams' and 'Happy Birthday Gorgeous'. The designer series paper is 'Tranquil Textures'. AND.... only uses one ink!

Thanks for dropping by!

Supplies Used:
Stamp sets - World of Dreams, Happy Birthday Gorgeous
Ink - Early Espresso
Paper - Early Espresso, Tranquil Textures DSP, Whisper White
Accessories - Early Espresso Satin Ribbon


Sunday, May 12, 2019

Mother's Day 2019


Mother's Day is always a hard time for me, as my Mother is no longer here on Earth. I know she is watching me from heaven, and I know I will be with her again someday! My husband still has his Mom, and she is a comfort to me too. I do have a few Mother-figures in my life, as does Mike too. 
My God-Mother (my Aunt Pat), my best friend's Mom (Kathy) and Mike's family friend (Jennifer). Thanks to all the Mom's out there who love, nurture and provide.... not only for your family, but to all the extended "family" too! Hugs and love to all of you!

I wanted to show you how I received inspiration from SallyStampers card (bottom)... and changed it to make it my own! Thanks for your inspiration Sally!

I utilized many different stamp sets for my cards. The banner is from 'Birthday Banners' and the words inside the banner is from 'Thoughtful Banners'. The flowers and leaves are from 'Falling Flowers' with it's coordinating 'May Flowers' framelits. The banner is die-cut using the 'Bunch of Banners' Framelits. My background is one that I absolutely LOVE!!!!! 'Layered Leaves' DTIEF.

Thanks for dropping by!

Supplies Used:
Stamp Sets - Falling Flowers, Birthday Banners, Thoughtful Banners
Ink - Grapefruit Grove, Daffodil Delight, Highland Heather, Blushing Bride, Memento, Blackberry Bliss, Melon Mambo
Paper - Grapefruit Grove, Daffodil Delight, Highland Heather, Blushing Bride, Whisper White
Accessories - Big Shot, Layered Leaves DTIEF, May Flowers Framelits, Bunch of Banners Framelits, dimensionals, glue dots, Lemon Lime Twist Organdy Ribbon


Friday, May 10, 2019

Layering Hugs


Connie's card (on the right) was so simple, yet beautiful... I just knew I had to create one of my own! Thanks Connie for your inspiration!

Now, I changed a few details to make it my own. The colors, obviously, but also the square for the sentiment. I used the Layering Squares dies instead of the Stitched Squares. And I used twine instead of ribbon.

Thanks for dropping by!

Supplies Used:
Stamp set - Healing Hugs
Ink - Memento, Daffodil Delight
Paper - Daffodil Delight, Basic Black, Whisper White
Accessories - Die Cut/Emboss Machine, Layering Squares Dies, Basic Black Twine, glue dots


Monday, May 6, 2019

Aviator Birthday


My neighbor wanted me to create a card for her Grandson's 1st birthday. She showed me the invite (on the right), so I used my digital software to design a card specific to Caleb.

The airplane and the pilot are from a website called PinClipArt. Which has free downloads of many images. The banner is actually one I manipulated to create one that was flying in the wind.

Thanks for taking a closer look!

Supplies Used:
My Memories Suite digital software
Embellishments - Airplane and Pilot (PinClipArt)
Shapes - triangle (white), banner (blue), square (white), stripes (blue and red)
Font - Beetle (red), Fantasy (blue)
Paper - Whisper White, Pacific Point

Warm Hugs

Ah! My favorite color combination! I decided to try a different technique with the "distinktive" stamp in the 'Healing Hugs' stamp set.

I stamped the image on Daffodil Delight, and then with the sponge dauber, I sponged Pumpkin Pie all around the edges. What a cool effect!

I also used a retired edgelit. "Adorning Accents" makes a beautiful card front!

Thanks for taking a peek!


Supplies Used:
Stamp Sets - Healing Hugs, Blooming With Kindness
Ink - Daffodil Delight, Pumpkin Pie, Old Olive
Paper - Old Olive, Whisper White
Accessories - Big Shot, Adorning Accents, sponge dauber, dimensionals, scissors


Tyler and Emily Wedding


My godson, Tyler, is marrying his bride, Emily. I was honored to be asked to create their wedding invitations for them. The wording on the invite, as well as, the response card was designed in my digital software (My Memories Suite) and printed on gray (Smoky Slate) cardstock.

The invite is matted in Whisper White cardstock and then adhered to the pocket card. The pocket card measures 5"x7". The response card measures 3.5"x5".

How to create the pocket card. Using an 8.5"x 10" piece of cardstock. Score at 5" (on the 10" side). On the 8.5" side. Score at 7" until you reach the scored line from the previous instructions, then cut the remaining section. Turning the piece again to the longer side (10"), cut the 1.5" piece out from the left-side to the center. Fold the scored pieces, and adhere the 1.5" piece with glue dots to create a small pocket on the right-hand side.

The ribbon was found at Joann Fabrics (turquoise) and online - Amazon (lace).

For the front of the invitation, I designed the "tag" with my digital software and printed it out on gray cardstock. Using my 'Apothecary Accents' framelits with my Big Shot... I die-cut the shapes out and adhered it to the ribbon/lace.

Thanks for taking a closer look.

Supplies Used:
My Memories Suite digital software
Fonts used - Shelley Volante Script (turquoise) and Bernhardt (black)
Paper - Smoky Slate and Whisper White
Accessories - Turquoise Organdy Ribbon, White Lace, glue dots, Big Shot, Apothecary Accents Framelits

To Be Beautiful

The 'Meant to Be' stamp set, I felt, was perfect for a wedding card. However, there wasn't a wedding sentiment within the set. So, I paired it with the 'Beautiful Bouquet' stamp set. Perfect!

I chose to use the colors of the wedding on this card - Smoky Slate, Tempting Turquoise and Whisper White.

Thanks for dropping by!

Supplies Used:
Stamp Sets - Meant To Be, Beautiful Bouquet
Ink - Tempting Turquoise
Paper - Smoky Slate, Tempting Turquoise, Whisper White
Accessories - Big Shot, Be Mine Framelits, Turquoise Organza Ribbon (non-SU), Smoky Slate Stitched Ribbon