Wednesday, July 30, 2014

Maymont Gardens


Working on another double-page spread for our 2013 Scrapbook.  I'm still working on May 2013, but I'm excited that I'm only 1 year behind being up-to-date!

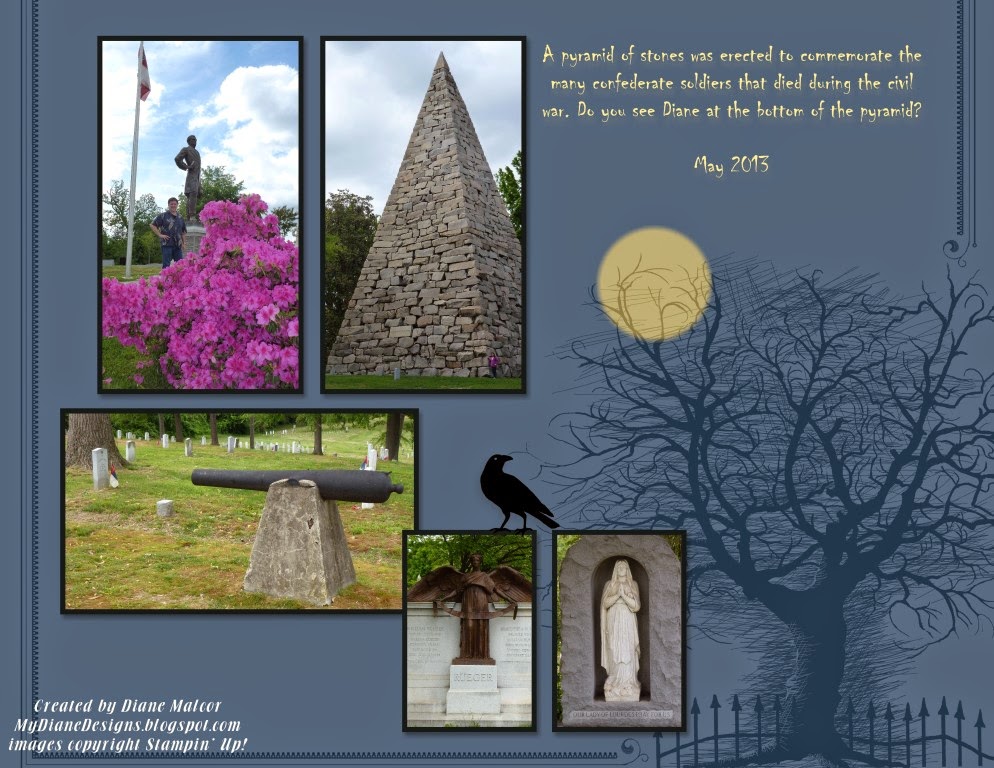
These two-pages are from our day at Maymont Gardens in Richmond, VA.  Beautiful place..... Richmond has a lot of things to do.  I know we didn't see all of it when we went on this trip.  We will need to plan to come back.

Thanks for taking a look!

Supplies used:
My Digital Studio, Stampin' Up! products

Background - Wild Wasabi
Stamp Brush Sets - Decorative Overlays (flourish - Lucky Limeade); Walk in the Park II (flowers - Island Indigo)
Embellishments - Walk in the Park II (leaf border); Basic Pearls
Punch - Square (Whisper White)
Font - Majestic (Whisper White and Island Indigo) and Bliss (Whisper White)

Tuesday, July 29, 2014

Something Stitched

I was really bummed when the Stitched Stockings stamp set was retired.  I felt that I hadn't really utilized it's full potential before it became a retired set.

Needing a baby card, and seeing so many cards created with 'baby booties' .... I wanted to create my own.

I used the Simply Scored Diagonal plate to create the 'baby blanket' underneath the 'booties'.  I colored the pearls with Daffodil Delight blendabilities before adhering them on the blanket.

Such an adorable card for an adorable baby!

Thanks for taking a peek!

Supplies Used:
Stamp set - Stitched Stockings, Something to Say
Paper - Whisper White, Daffodil Delight
Ink - Daffodil Delight
Accessories - Simply Scored Scoring Tool, Simply Scored Diagonal Plate, Taffeta Ribbon (Daffodil Delight), Basic Pearls (colored Daffodil Delight with blendabilities), Grosgrain Stitched Ribbon (Daffodil Delight), Stocking Punch, glue dot

Wednesday, July 23, 2014

Serene Saying

Yay! I made a masculine card that I absolutely LOVE! It's so very striking with just black and white!  Usually my masculine cards are just so-so (I know.... I am my worst critic. lol)!

Thanks for taking a peek!

Supplies Used:
Stamp Sets - Serene Silhouettes, Something to Say
Paper - Whisper White, Basic Black
Ink - Black Staz-on
Accessories - Big Shot, Banners Framelits, Stylish Stripes TIEF, stamp-a-ma-jig

Tropical Bloom


Here is a card I "copied" from Heidi Baks.  Her's was so tropical looking that I wanted to try my hand at creating something similar with the stamps, inks that I had.


Thanks for taking a look!

Supplies Used:
Stamp set - Bloom with Hope
Paper - Crumb Cake, Soft Sky, Whisper White
Ink - Crumb Cake, Soft Sky, Coastal Cabana, Daffodil Delight, Old Olive, Early Espresso
Accessories - masking, sponging

Disneyland - July Progressive Challenge


These two pages were created using the July Progressive Digi-Scrap Challenge found on the Splitcoaststampers website.  Every week new steps are added, so at the end of each month -- you have a completed scrapbook page(s).  You may view the first week challenge here: 

Background paper - Small Polka Dots DSP (Real Red)

Punch - Square (filled w/Textured Cardstock - Basic Black); Flag (filled w/Whisper White); Circle (filled w/Whisper White, Basic Black, Blush Blossom); Butterfly (minnie's bow - filled w/Rose Red small dots DSP)

I used the corner round feature on all photos and the black background.

Embellishments - Grosgrain Ribbon (Daffodil Delight); Basic Rhinestones; Brad (Daffodil Delight); Flower Brad (Real Red)

Stamp Brush Set - July Fourth (Whisper White and Daffodil Delight at 60% opacity); Enjoying Everything (nature frame - Daffodil Delight)

Font - Cuckoo and Walt Disney Script (Basic Black)

Thursday, July 17, 2014

Love - MDSM74


I decided to work on a few challenges this week.  On the MDS Monday Blog, they provide a sketch....AND... they provide new techniques to try within your My Digital Studio program.  This one was so much fun to create.  You may view the challenge here: 

They wanted us to try the technique of grouping photo boxes together, but with a twist.  Taking one photo box and off-setting it with all the others AND making all the other photo boxes B/W.  To do this, first create however many photo boxes you'd like in a row (align them up by top and space evenly horizontally), next offset one of the photo boxes, then group all the photo boxes together, finally add your photo. Now, with that said.... there is no way to move the photo around to get it where you need within a photo box, so you may need to make adjustments before placing your photo in.  Now.... to make just your focal panel in color and all the others B/W:  first ungroup the photo boxes, next click each panel that you want to change to B/W and select 'Photo Effect' from the Design Center (right-hand side).... then choose Black and White and 'ok'.

Thanks for taking a peek!

Supplies Used:
Background - Basic Black
Embellishments - Glimmer Kit (chevron, heart, trim, words 'love' - Silver)
Punch - Heart (Basic Black); Square (Basic Gray); Flag (Whisper White)
Stamp Brush Set - Simple Snapshots (words 'the beauty of' - Basic Black) <--Note: I did crop the word 'Life' from this stamp
Font - Formal (Basic Black)


Wednesday, July 9, 2014

Perfect Patch

Yay! Finally got my backordered stamp set "Flower Patch".  I couldn't wait to use it.

I paired it with the Perfect Pennants stamp set (dots) you see on the side.

The Flower Fair Framelits work great -- no fussy cutting!!!

Thanks for taking a peek!

Supplies Used:
Stamp Sets - Flower Patch, Perfect Pennants
Paper - Wisteria Wonder, Elegant Eggplant, Whisper White
Ink - Wisteria Wonder, Elegant Eggplant
Accessories - stamp-a-ma-jig, Flower Fair Framelits, Big Shot, Basic Rhinestones, glue dots

Tuesday, July 8, 2014

Hollywood Cemetery

 
I'm really liking how these two pages came out with the background I created. Here's what I did to create the background piece:  I started with Night of Navy cardstock as my base.  I then layered the Night Owl DSP #3 ontop (using a photo box), and changed the opacity to 20% to bring out the hazy blue you see here. 
Now, to get the hazy moon:  Add a circle punch to your image. Now fill it with any DSP (doesn't matter which one as you won't see it in the finished image).  Double-click on the circle to show the 'punch image editor' and zoom out of your DSP image to make it very small. Now.... with your mouse take the DSP completely out of the circle punch (so white appears in the shape). Select 'OK'.  Lastly, click on the Drop Shadow properties box (for the circle punch), and change the color to Daffodil and the opacity to 50%.  Select 'OK'.
I placed the moon behind the Night Owl DSP layer to make the moon a bit more hazy and to view the branches on the tree better.

Thanks for taking a look!

Supplies Used:
Background - Night of Navy
Punch - Square (filled w/Night Owl DSP #3 at 20% opacity); Circle (filled w/Daffodil Delight drop shadow)
Stamp Brush Set - Spooky Things (crow- Basic Black)
Font - Chiller (Daffodil Delight)

Monday, July 7, 2014

Dana Point and Laguna Beach


Another double-page spread completed! Yay! Our 2013 photobook is really coming together.  Mike and I took a trip to Southern California with Mike's parents.... this is part of our trip with them.  We enjoyed our time together.

Thanks for taking a peek!

Supplies Used:
Background - Whisper White
Embellishments - Grosgrain Ribbon (Cherry Cobbler)
Stamp Brush Sets - The Open Sea (anchor - Chocolate Chip)
Punch - Square (filled w/Nautical Expedition DSP #2, Textured Cardstock - Not Quite Navy and Whisper White)
Font - Nouveau (Not Quite Navy)

The Alamo and RiverWalk


Continuing work on our 2013 scrapbook with our trip to San Antonio with Deb's family.  We went to where the Alamo was fought and took a boat tour of the RiverWalk.  Such rich history here.  We had a lot of fun!  I made the background to resemble the Texas flag (even though you can hardly see the star on the blue part!)! =)

Thanks for looking!

Supplies Used:
Background - Real Red
Punch - Square (filled w/Whisper White and Textured Cardstock - Night of Navy); Star (filled w/Whisper White)
Embellishments - Staples and Stitches (zigzag - Whisper White)
Font - Cerebral (Night of Navy); Sliver (Real Red)

Wednesday, July 2, 2014

So-Cal Horse Show and Farm


Continuing work on our 2013 photobook with our trip to Southern California to visit Mike's family. His sister, Karen, and her husband, Michael, competed in the So-Cal Miniature Horse Show while we were there.  It was fun to see what they both enjoy.... Karen racing in the carriage race and Michael being the MC (the guy who announced the competitions and the winners).  Afterward, we took a tour of their farm, where they board horses -- both miniature and regular size; keep ducks, goats and dogs and cats....as well as parakeets and frogs. We had a great time!

Thanks for taking a look!

Supplies Used:
Background - Textured Cardstock (Crumb Cake)
Punch - Square (filled w/Basic Black)
Stamp Brush Sets - Modern Medley (quatrefoil reversed - Elegant Eggplant); Spring Fever (border - Basic Black); Frames with a Flourish (swirl - Basic Black)
Embellishments - Satin Ribbon (Basic Black); Flower Brad (Basic Black)
Font - Cuckoo (Basic Black)